Camp Lodging and Travel Needs
This next installment in the camping gear guide is all about where you’ll be sleeping and how you’ll be getting there. That is, lodging, navigation, and campsite essentials. If you’re curious where to buy this stuff, read the first installment here, otherwise, continue onwards:
The roof over your head
First off, you’ll want to choose a decent tent. You can get by with anything from an ancient pup tent to a Kmart dome tent, though your new home may not last too long in bad weather. However, if you’re convinced you’ll have perfect weather or have the back seat of the car as a backup option, go the cheap route and scrounge an old tent from someone’s basement. Mildew remover, in that case, will be invaluable, trust me.
As far as tents go, style-wise, you have roughly two choices:
Scout or pup-tent-style A-frame


These tents tend to be sturdy and easy to set up, though often a bit heavier. The Eureka Timberline is the classic example of this style, though I have read complaints with the construction of their entry-level tent in recent years and would recommend the Timberline SQ XT model (shown above) for greater durability.
 Dome-style
Most backpacking tents are dome tents, as they tend to be lighter and thus more packable. Dome tents are named because of their domed shape and tend to have flexible fiberglass or aluminum poles that create a free-standing sleeping compartment. Many cheaper tents you’ll find at garage sales and in the attic will be dome tents. Just make sure you can manage the weight between two people and if the rain fly covering the top vent is very small, bring a medium-sized tarp as a backup.
Tent prices and considerations
REI has quality entry-level tents for under $150, while we got our Marmot one for under $100 on sale. Coleman is another known brand with good value in the $40-60 range, though their gear tends to be a bit heavier and lower quality.
Cheap tents will either be really heavy or may break mid-trip, so brand name is key, especially if you’ll be far from civilization. A good 2-person tent will be 3.5-6 lbs with shock-corded aluminum poles, though 8 lbs or more can be split between 2 people with one person carrying the poles and the other the body. Price: at least $70-80 on closeout or $150-200+ full-price.
Other tent-like options
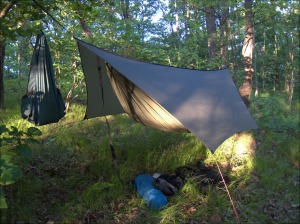
If you’re looking to shed serious weight, leave the tent at home and opt for an enclosed hammock. I haven’t tried one of these, but since they don’t have poles, they fit into the palm of your hand when packed. Of course, if you’re camping in an area without trees, a hammock wouldn’t be too useful, though that isn’t a problem here in the Northeast.
Harriman State Park has lean-tos, so if you’re feeling lucky you could jettison the tent and sleep in the three-walled shelters or out under the stars. Some people use bivvy sacks, which are little less than tarps and are discussed below. I tend to get bitten by mosquitos or wake up covered in a layer of dew on such occasions, so I’d prefer a simple dome tent.
Tent footprint
Unless you like the possibility of a heavy rain or sharp stick passing through the bottom of your tent, you’ll want to bring either a tarp, heavy plastic, or Tyvek to cover the ground under the tent and protect your investment. Price: under $10 at any hardware store or Kmart. This small investment will prolog the life of your tent.
Wrap it up: Your sleeping bag
The tradeoff with sleeping bags is bulk vs. temperature rating and the choice you’ll have to make is synthetic vs. down. Here’s a link to an external site with an even more detailed rundown, though I wouldn’t take their prices.

Synthetic
Stick to a mummy-style bag like the ones above, not a bulky square quilted one. Cold weather synthetic bags can be huge to the point of taking up the entire inside compartment of your backpack, though using a compression sack can help reduce its bulkiness or with an external frame pack you can strap the bag to the outside to save space. The big advantage is price – a decent synthetic bag from a reputable brand such as Marmot, Kelty, or Slumberjack will cost from $60-80, less than half the price of a comparable down bag.
Down
Down bags are incredibly compact, i.e. smaller than a balled-up jacket, and lightweight. They’re like puffy winter coats for your whole body. On the negative side, they lose their loft and become useless if soaked. The cheapest down bags run from $130-200 and up. Serious mountaineers will have a heavy-duty down bag with waterproof cover and newer down bags have specially treated loft, moisture problem solved.
Sleeping pad
A pad keeps you warm, dry, and comfortable by insulating and lifting you off the ground. The foam Thermarest Ridgerests we have – see the internal frame pack image below – cost around $15-30 while fancy self-inflating models can cost well over $100. You can cheap out here and be totally fine.
Second layer
If you tend to feel cold or are worried your sleeping bag won’t stand up to a harsh winter night, you can search out either a sleeping bag liner or bivvy sack – An inner liner of fleece can raise the temperature rating 10-15 degrees and is great for a synthetic bag, while a water and windproof bivvy sack outer cover is great to add a season and some weather protection to your down bag, especially if you can find in waterproof, breathable GoreTex. If you’re adventurous and looking to pack light, you can use a bivvy sack in place of a tent and sleep outdoors. Price: $15-40 for liner, $50-100 or more for bivvy sack.
Carry me home: Your backpack
The backpack carries your gear and distributes the weight onto your back and hips so your shoulders don’t bear the brunt of the load. Packs can easily last for 40 years and remain useful, just be sure that they have a padded waist belt, as the majority of weight should be distributed on your hips, not your shoulders. Heavy-duty nylon and sturdy zippers are two other key considerations if you’re looking to get some serious use from your purchase.
Good brands include Kelty, Jansport, Lowe Alpine, Gregory, REI, and others. Expect to spend $150 and up (new) and as little as $30-50 for a used external frame pack.
There are two styles of pack:
External frame


External frames are inexpensive, versatile, durable, and plentiful on the used market. In fact, it can be difficult to find much in the way of brand-new external frame packs and there are models from as early as the 1960s that are useable and fully functional today. They tend to consist of a square-ish aluminum pack frame, central compartment for clothing and gear, and empty space below along the frame to attach a stuff sack with sleeping bag using bungee cords or straps. One of their biggest advantages is the ability to hang stuff off the frame, thereby expanding your packing ability.
Internal frame

Internal frames are sleek, new, and ergonomic. They carry their metal back support inside the main compartment of the pack, hence the name. Since they more closely follow the shape of your body, they can be useful when doing more strenuous or adventurous activities where you need to stay agile. They are also very useful in place of a suitcase on a bus or airplane, since they are self-contained and zip up like a suitcase or buckle shut.
We have two Kelty internal frame packs from 1995-2000 and both are going strong. We recently had to replace the buckle on the hip belt on the older pack, but it was a simple $4 replacement part at REI.
Backpack cover
If you get caught in a downpour, it’s great to have a cover for your pack. These are just modified tarp-like squares of waterproof fabric with either a drawstring or elastic around the edge to close around your pack. Price: $12-30.
Knife or multi-tool
A knife is the ultimate camping tool, whether prepping a bandage, preparing dinner, or cutting rope. Generally, the blade shouldn’t be wider than the palm of your hand – around 4 inches – and should lock into place when open, for safety. A blade that folds closed protects you and stops you from poking holes in your pack. As long as your knife is sharp enough, fits in your pack, and has safety features, it should be enough. Price: an inexpensive Swiss army knife will cost under $20.
Headlamp or flashlight
New LED light last for days and are inexpensive. This is the biggest jump in technology since I was a Scout, so make sure you’re not relying on an old incandescent flashlight. Headlamps are especially useful if you plan to set up camp in the dark. A simple LED flashlight can be found for under $10, while headlamps cost from $15-20 and up.
 Map
Map
Why would you go camping without a map of the area, unless you enjoy getting lost? A good map has clearly marked trails and physical features like mountain peaks, rivers, and elevation. I buy the map and then make photocopies for everyone in the group, highlight the route with a highlighter, and place the map inside a ziplock bag for protection against water, that way your original map stays clean and crisp.
The New York / New Jersey Trail Conference sells waterproof topographical maps of NYC-area trails on their website and through REI, EMS, and Amazon. Price: $8-16, depending on the map.
Extra cash
This should be self-explanatory. There are no ATMs in the woods.
Parachute cord or rope
When camping you should hang a bear bag, which is a stuff sack full of your food and smelly items to hide from animals. How to hang a bear bag: https://www.youtube.com/watch?v=l_WA-ZWv4cA
You’ll need load-bearing cord or rope, around 50-100 feet, for hanging the bag out of reach over a tree limb. We bought ours on Amazon though all outdoors stores and most hardware stores will have it. Price: around $10 for 100 feet.
Compass

You’ll want a compass with a rotating bezel. This is so you can orient your map and point yourself in the right direction. Good brands include Suunto, Silva, Brunton. Price: $10-20 for a starter compass. Since I couldn’t find any simple tutorial videos, I’ll get into using a compass and map in a subsequnt post.
That’s it for now. If you’re ready to head out with no clothes, you’re set, otherwise, read on:

Leave a comment